|
|
|

Purpose
To make an edge Photo using the Sobel edge detector operator. The result edge Photo is a binary image, whose pixel values are either 0, background, or 255, edge pixel.
Class
Photo
Usage
{Photo} ret = object.EDGESOBEL([{double} argm1])
argm1 = a cutoff value.
A pixel whose slope magnitude larger than cutoff value is considered edge pixel. If not given, the function will determine it by using a noise estimation function.
Example:
|
->ph2 = ph1.edgesobel() -> |
See also (class function)
Purpose
To perform Exterior Orientation (EO) using bundle adjustment single photo resection. The function requires at least 3 ground control points, with x y z coordinate. The input measure coordinates on the photograph can be either row and column numbers, x y image rectangular coordinates, or x y photo coordinates. See details in Understanding Coordinate System.
The function assumes that row and column numbers as input data are measured from the calling photo. If not, they must be converted to x y image rectangular coordinates, or x y photo coordinates. Sometimes the user might measure row and column numbers of points on the original full size image, while the calling photo is a portion, sub-images, of the original photos.
In most circumstances, it is necessary to perform Interior Orientation (IO) prior to EO. IO parameters are used to transform between row and column numbers or x y image rectangular coordinates to x y photo coordinates.
The results Exterior Orientation Parameters (EOP) are used to updated EOP of the calling photo object.
Moreover, an ASCII text file is automatically generated after the EO is done. Also a matrix containing EOP and all related information are return to the user. This matrix is is actually where the information in the report is from. By comparing the returning matrix to the report, the user can easily figure out what output information is represented by which part of the matrix.
The computation of this function does not involve image data, therefore, it is possible to load the photo in virtual mode, using function "vload". This can reduce computer time tremendously, especially when the size of the photo is very large.
Class
Photo
Usage
{Matrix} ret = object.EO({VecIdPt2D} argm1, {VecIdPt3D} argm2, [{String} argm3, {int} argm4])
argm1 = list of coordinates with ID, measured on photo
argm2 = list of ground control coordinates with ID
argm3 = output file name for the report (default = "RPT_EO.txt")
argm4 = type of measuring coordinates on the photo,
must be 0(row and column), 1(image rectangular coordinate), or 2(photo coordinate)
(default = 0 (row and column number))
Example:
|
->Mtmp = ph1.EO(vec_1, vec_2,
"my_EO_report", 0) -> |
See also (class function)
EO_SC1, EO_SC2, EO_SC3, IO
Purpose
To report the current Exterior Orientation Parameters of the photo..
Class
Photo
Usage
{Vector} ret = object.EO_PARA()
Example:
|
->vec_para = ph1.eo_para() -> |
See also (class function)
io_para12, io_para21
Purpose
To perform Exterior Orientation (EO) and self calibration of 1 camera parameter, using bundle adjustment single photo resection. The function requires at least 3 ground control points, with x y z coordinate. The input measure coordinates on the photograph can be either row and column numbers, x y image rectangular coordinates, or x y photo coordinates. See details in Understanding Coordinate System.
The function assumes that row and column numbers as input data are measured from the calling photo. If not, they must be converted to x y image rectangular coordinates, or x y photo coordinates Sometimes the user might measure row and column numbers of points on the original full size image, while the calling photo is a portion, sub-images, of the original photos.
The additional parameter inserted into the bundle adjustment model is the focal length of the camera. This function can be used to calibrate the focal length of an unknown camera. Its best estimated value is reported in the output report file.
The function will update the EOP of the photo, however it will not update the current value of the camera focal length.
In most circumstances, it is necessary to perform Interior Orientation (IO) prior to EO. IO parameters are used to transform between row and column numbers or x y image rectangular coordinates to x y photo coordinates.
The results Exterior Orientation Parameters (EOP) are used to updated EOP of the calling photo object.
Moreover, an ASCII text file is automatically generated after the EO is done. Also a matrix containing EOP and all related information are return to the user. This matrix is is actually where the information in the report is from. By comparing the returning matrix to the report, the user can easily figure out what output information is represented by which part of the matrix.
The computation of this function does not involve image data, therefore, it is possible to load the photo in virtual mode, using function "vload". This can reduce computer time tremendously, especially when the size of the photo is very large.
Class
Photo
Usage
{Matrix} ret = object.EO_SC1({VecIdPt2D} argm1, {VecIdPt3D} argm2, [{String} argm3, {int} argm4])
argm1 = list of coordinates, measured on photo
argm2 = list of ground control coordinates
argm3 = output file name for the report (default = "RPT_EO.txt")
argm4 = type of measuring coordinates on the photo,
must be 0(row and column), 1(image rectangular coordinate), or 2(photo coordinate)
(default = 0 (row and column number))
Example:
|
->Mtmp = ph1.EO_SC1(vec_1,
vec_2, "my_EO_report", 0) -> |
See also (class function)
EO, EO_SC2, EO_SC3, IO
Purpose
To perform Exterior Orientation (EO) and self calibration of 2 camera parameters, using bundle adjustment single photo resection. The function requires at least 3 ground control points, with x y z coordinate. The input measure coordinates on the photograph can be either row and column numbers, x y image rectangular coordinates, or x y photo coordinates. See details in Understanding Coordinate System.
The function assumes that row and column numbers as input data are measured from the calling photo. If not, they must be converted to x y image rectangular coordinates, or x y photo coordinates. Sometimes the user might measure row and column numbers of points on the original full size image, while the calling photo is a portion, sub-images, of the original photos.
The additional parameters inserted into the bundle adjustment model is the x y coordinate of the principal point of the camera. This function can be used to calibrate the coordinate of the principal point of an unknown camera. Its best estimated value is reported in the output report file.
The function will update the EOP of the photo, however it will not update the current value of the camera principal coordinate.
In most circumstances, it is necessary to perform Interior Orientation (IO) prior to EO. IO parameters are used to transform between row and column numbers or x y image rectangular coordinates to x y photo coordinates.
The results Exterior Orientation Parameters (EOP) are used to updated EOP of the calling photo object.
Moreover, an ASCII text file is automatically generated after the EO is done. Also a matrix containing EOP and all related information are return to the user. This matrix is is actually where the information in the report is from. By comparing the returning matrix to the report, the user can easily figure out what output information is represented by which part of the matrix.
The computation of this function does not involve image data, therefore, it is possible to load the photo in virtual mode, using function "vload". This can reduce computer time tremendously, especially when the size of the photo is very large.
Class
Photo
Usage
{Matrix} ret = object.EO_SC2({VecIdPt2D} argm1, {VecIdPt3D} argm2, [{String} argm3, {int} argm4])
argm1 = list of coordinates, measured on photo
argm2 = list of ground control coordinates
argm3 = output file name for the report (default = "RPT_EO.txt")
argm4 = type of measuring coordinates on the photo,
must be 0(row and column), 1(image rectangular coordinate), or 2(photo coordinate)
(default = 0 (row and column number))
Example:
|
->Mtmp = ph1.EO_SC2(vec_1,
vec_2, "my_EO_report", 0) -> |
See also (class function)
EO, EO_SC1, EO_SC3, IO
Purpose
To perform Exterior Orientation (EO) and self calibration of 3 camera parameters, using bundle adjustment single photo resection. The function requires at least 3 ground control points, with x y z coordinate. The input measure coordinates on the photograph can be either row and column numbers, x y image rectangular coordinates, or x y photo coordinates. See details in Understanding Coordinate System.
The function assumes that row and column numbers as input data are measured from the calling photo. If not, they must be converted to x y image rectangular coordinates, or x y photo coordinates. Sometimes the user might measure row and column numbers of points on the original full size image, while the calling photo is a portion, sub-images, of the original photos.
The additional parameters inserted into the bundle adjustment model is the camera focal length, and the x y coordinate of the principal point of the camera. This function can be used to calibrate the camera focal length as well as the coordinate of the principal point of an unknown camera. The best estimated value is reported in the output report file.
The function will update the EOP of the photo, however it will not update the current value of the camera principal coordinate, nor does the camera focal length.
In most circumstances, it is necessary to perform Interior Orientation (IO) prior to EO. IO parameters are used to transform between row and column numbers or x y image rectangular coordinates to x y photo coordinates.
The results Exterior Orientation Parameters (EOP) are used to updated EOP of the calling photo object.
Moreover, an ASCII text file is automatically generated after the EO is done. Also a matrix containing EOP and all related information are return to the user. This matrix is is actually where the information in the report is from. By comparing the returning matrix to the report, the user can easily figure out what output information is represented by which part of the matrix.
The computation of this function does not involve image data, therefore, it is possible to load the photo in virtual mode, using function "vload". This can reduce computer time tremendously, especially when the size of the photo is very large.
Class
Photo
Usage
{Matrix} ret = object.EO_SC3({VecIdPt2D} argm1, {VecIdPt3D} argm2, [{String} argm3, {int} argm4])
argm1 = list of coordinates, measured on photo
argm2 = list of ground control coordinates
argm3 = output file name for the report (default = "RPT_EO.txt")
argm4 = type of measuring coordinates on the photo,
must be 0(row and column), 1(image rectangular coordinate), or 2(photo coordinate)
(default = 0 (row and column number))
Example:
|
->Mtmp = ph1.EO_SC3(vec_1,
vec_2, "my_EO_report", 0) -> |
See also (class function)
EO, EO_SC2, EO_SC3, IO
Purpose
To fill a closed polygon, defined by a poly-line, in a Photo. The fill value is taken from the current value of the red color, set by command "set pencolor".
Class
Photo
Usage
{void} object.FILLPOLY({VecPt2D} argm1)
argm1 = list of x y coordinates of a polygon, stored in a VecPt2D object.
Example:
|
->ph1.fillpoly(pline1) -> |
See also (class function)
drwcircle, drwline, drwpline
Purpose
To report the current value of flag_earth. It indicates whether the computation of x y photo coordinates must take into account the earth curvature correction. When its value is 0 (off), there will be no earth curvature correction applied to photo coordinates. When a Photo is initiated, its flag_earth value is zero (off).
Class
Photo
Usage
{bool} ret = object.FLAG_EARTH()
Example:
|
->flag = A.flag_earth() -> |
See also (class function)
flag_rdd, flag_refract
Purpose
To report the current value of flag_rdd. It indicates whether the computation of x y photo coordinates must take into account the lens distortion correction (radial, decentering and affine distortion) . When its value is 0 (off), there will be no lens distortion correction applied to photo coordinates. When a Photo is initiated, its flag_rdd value is one (on).
Class
Photo
Usage
{bool} ret = object.FLAG_RDD()
Example:
|
->flag = A.flag_rdd() -> |
See also (class function)
flag_earth, flag_refract
FLAG_REFRACT
Purpose
To report the current value of flag_refract. It indicates whether the computation of x y photo coordinates must take into account the atmospheric refraction correction. When its value is 0 (off), there will be no atmospheric refraction correction applied to photo coordinates. When a Photo is initiated, its flag_refract value is zero (off).
Class
Photo
Usage
{bool} ret = object.FLAG_REFRACT()
Example:
|
->flag = A.flag_refract() -> |
See also (class function)
flag_rdd, flag_earth
FLAG_ROTATE
Purpose
To report the current value of flag_rotate. The flag rotation indicates the rotation angle of the photo object image, with respect to the original image in the digital camera. 0=no rotation 1=90 2 = 180 3=270 degrees counter-clockwise.
Class
Photo
Usage
{int} ret = object.FLAG_ROTATE()
Example:
|
->flag = A.flag_rotate() -> |
See also (class function)
flag_rdd, flag_earth, frag_refract
Purpose
To find straight lines in an image using Modified Hough Transform technique. The user specify how many straight lines being wanted to extract. The six control parameters, namely theta1, theta2, theta_step, Lo1, Lo2, and Lo_step, setting via the command SET MHT_LINE, can be used to control the orientation and position of lines that are to be found.
The general equation of a line is as describing in the following figure.
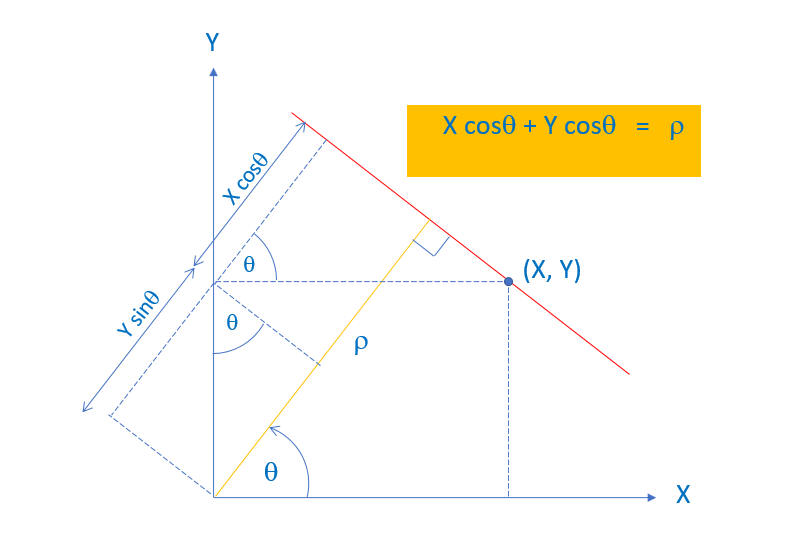
where theta is the angle measured counter-clockwise from the x-axis to the perpendicular line, which is drawn from the origin to the line, and
Lo is the length of the perpendicular line.
Given X and Y of a point, and by varying the angle theta, Modified Hough Transform technique calculates Lo and put a vote in an accumulator array at the specific cell whose theta and Lo values are equal to the values use in calculation.
The range of theta angle and the range of Lo value along with the stepping value of theta angle and Lo are specified by the six parameters in the set command.
To see the current setting, just type "mht_line" without a parameter.
Either the calling photo object is itself an edge image, or let the function creates an edge image, by setting the flag value (argument 3) to 1, an image file is created and save under the file name "Temp_edge", or otherwise specify by the user as argument 2, in which case the file name will be "xxx_edge".
A check plot image is created to show the extract lines superimpose on the edge image. Each extract line is colored according to the color map table, defined by the "set colormap" command. Also the Accumulator array image is store under the name "Temp_Acc_array", or otherwise specify by the user as argument 2, in which case the file name will be "xxx_Acc_array".
Class
Photo
Usage
{VecrcPline} ret = object.GCP2RC({int} argm1, [{String} argm2, {int} argm3])
argm1 = no of straight lines being wanted
argm2 = file name for the edge image, check plot image and accumulator array image.
default is Temp_edge for the edge image file name,
Temp_plot for the check plot image file name and
Temp_Acc_array for the accumulator array image file name.
if a name is given here, for example XXX
then the file name for the edge image will be XXX_edge,
the file name for the check plot image will be XXX_plot, and
the file name for the accumulator array image will be XXX_Acc_array.
argm3 = flag whether the Photo itself is an edge image (0=yes, 1=no) default = 0
Example:
|
->set
MHT_LINE 15 30 1 0 2000 1
(set theta angle range to 15-30 step size = 1 and Lo range to 0-2000 step
size = 1) ->V = ph1.findline(5, "photo102", 1) -> |
See also (class function)
calibxpyp
Purpose
To convert from a ground control coordinate, x y z, to row and column number.
Class
Photo
Usage
{Indx} ret = object.GCP2RC({double} argm1, {double} argm2, {double} argm3)
argm1 = x ground control coordinate
argm2 = y ground control coordinate
argm3 = z ground control coordinate
Example:
|
->ind = ph1.gcp2rc(600, 700, 100) -> |
See also (class function)
gcp2xpyp
Purpose
To compute from a ground control coordinate, x y z, to x y photo coordinate..
If the lens distortion flag, earth curvature flag, or refraction flag, is turn on (0=off 1 =on), then lens distortion, earth curvature effect and refraction effect, will be added to the computed photo coordinate after coming out from the collinearity equation.
Class
Photo
Usage
{Pt2D} ret = object.GCP2RC({double} argm1, {double} argm2, {double} argm3)
argm1 = x ground control coordinate
argm2 = y ground control coordinate
argm3 = z ground control coordinate
Example:
|
->pt = ph1.gcp2rc(600, 700, 100) -> |
See also (class function)
gcp2xy
Purpose
To get a value of an element at a particular index in a matrix of a Photo. The photo must be virtually loaded, by using a function "vload".
Function "vload" does not really load data into memory, therefore, this function simply go to the required position and read data directly from the file.
Class
Photo
Usage
{uchar} ret = object.GOGET({int} argm1, {int} argm2)
argm1 = row number
argm2 = column number
Example:
|
->a = ph1.goget(20,360) -> |
See also (class function)
goset, gosetmat
Purpose
To set a value of an element at a particular index in a Matrix of a Photo. The photo must be virtually loaded, by using a function "vload".
Function "vload" does not really load data into memory, therefore, this function simply go to the required position and write data directly to the file.
Class
Photo
Usage
{void} object.GOSET({int} argm1, {int} argm2, {uchar} argm3)
argm1 = row number
argm2 = column number
argm3 = a new value set at the particular index
Example:
|
->A.goset(20,360, 99) -> |
See also (class function)
goget, gosetmat
Purpose
To set new values of elements in a particular portion in a Matrix of a Photo. An index at which the upper left corner of the sub-matrix to be placed is specified by the user. The photo must be virtually loaded, by using a function "vload".
Function "vload" does not really load data into memory, therefore, this function simply go to the required positions and write data directly to the file.
Class
Photo
Usage
{void} object.GOSET({int} argm1, {int} argm2, {Matrix_uch} argm3)
argm1 = row number of a point at which the upper left window is located
argm2 = column number of a point at which the upper left window is located
argm3 = a matrix whose values is to be copied onto the calling photo's matrix
Example:
|
->ph1.vload("ph_1") Photo virtually loaded... ->b = [10 20; 30 40] ->ph1.gosetmat(1,1,b) -> |
See also (class function)
goget, goset